
- 분류 전체보기 (7925)

- 공지사항 (22)
- Format&Encrypt (13)
- Java (360)
- C (50)
- C++ (52)
- C샵 (NET) (143)
- Python (150)
- Go Lang (Go 언어) (107)
- Kotlin (550)
- Swift (219)
- Objective-C (193)
- Android (978)
- IOS (638)
- Flutter (364)
- FrontEnd (109)
- JavaScript (386)
- Jquery (103)
- Http & Api (101)
- VueJs (51)
- AngularJs (10)
- ReactJs (16)
- SE & OS & HW (52)
- DataBase (103)
- OracleDB (202)
- MySqlDB (103)
- MsSqlDB (107)
- Network (113)
- Spring (118)
- NodeJs (222)
- Redis (RDS) (31)
- Aws (Amazon) (53)
- ADB (cmd) (51)
- MacOs (cmd) (27)
- Linux (cmd) (146)
- Window (cmd) (34)
- Office (23)
- 비트버킷 & Git (75)
- Library & F.W (111)
- 참고 사이트 (161)
- IT정보 & IT소식 (269)
- IT기술 & IT용어 (267)
- 투케이2K 에러관리 (305)
- 투케이2K 업무정리 (152)
- 투케이2K 유틸파일 (162)
- 투케이2K 알고리즘 (105)
- 투케이2K 로직정리 (139)
- 투케이2K 학습정리 (140)
- 투케이2K 일상&생활 (39)
Notice
Recent Posts
Recent Comments
Link
투케이2K
70. (html/css/javascript/jquery) checkbox , label 사용해 체크 박스 스타일 커스텀 지정 실시 본문
FrontEnd
70. (html/css/javascript/jquery) checkbox , label 사용해 체크 박스 스타일 커스텀 지정 실시
투케이2K 2021. 8. 4. 09:25[개발 환경 설정]
개발 툴 : Edit++
개발 언어 : html, css, js, jquery
[소스 코드]
<!DOCTYPE HTML>
<!-- 표시 언어 지정 -->
<html lang="ko">

<!-- 헤더 정의 부분 -->
<head>
    <title>MAIN</title>
    <meta http-equiv="Content-Type" content="text/html; charset=utf-8">
    <meta http-equiv="X-UA-Compatible" content="IE=edge">

    <!-- [반응형 뷰 포트를 사용하기 위함] -->
    <meta name="viewport" content="width=device-width, initial-scale=1">


    <!-- 내부 CSS 스타일 지정 -->
    <style>

        /* [html, body 영역 스타일 지정] */
        html, body{
            width : 100%;
            height : 100%;
            margin : 0;
            padding : 0;
            border : none;
            overflow : auto;
        }


        /* body 스크롤바 메인 스타일 지정 */
        body::-webkit-scrollbar {
            width: 0px;
            background-color: #c1c1c1;
        }
        /* body 스크롤바 thumb 스타일 지정 */
        body::-webkit-scrollbar-thumb {
            background-color: #444444;
        }


        /* [체크박스 관련 스타일 지정] */
        input[type='checkbox'] + label {
            /* [체크박스 선택 (크기) 상위 부모 사이즈 만큼 설정] */
            width: 100%;
            height: 100%;

            /* [체크박스 선택 (전) 테두리, 배경 색상 지정] */
            /*border-radius: 10px;*/
            /*border: 2px solid #171e38;*/
            /*background-color: #ffffff;*/


            /* [체크박스 클릭 (전) 이미지 설정] */
            background-image : url(../assets/image/black_check_icon_off.png);
            background-repeat : no-repeat;
            background-position : center center;
            background-size : 100% 100%;


            /* [display 선언 : 커스텀 스타일 활성] */
            display: block;
        }
        input[type='checkbox']:checked + label {
            /* [체크박스가 클릭 되었을 때 배경 변경] */
            /*background: #007bff;*/


            /* [체크박스가 클릭 되었을 때 전체 이미지 변경] */
            background-image : url(../assets/image/black_check_icon_on.png);
            background-repeat : no-repeat;
            background-position : center center;
            background-size : 100% 100%;
        }

    </style>


    <!-- Jquery CDN 로드 : 항상 최신 버전 사용 -->
    <script src="https://code.jquery.com/jquery-latest.min.js"></script>


    <!-- 내부 JS 지정 : 일반 -->
    <script>

        /*
        [JS 요약 설명]
        1. window.onload : 웹 브라우저 로드 완료 상태를 나타냅니다
        2. change : 특정 객체 상태 변경 상태를 확인합니다
        3. $(this).is(":checked") : 체크박스가 체크된 상태를 확인합니다
        4. 참고 : 특정 태그 $("#check_1") 내에서 다시 태그를 지정시에는 this 를 사용해 지정할 수 있습니다
        */


        /* [html 최초 로드 및 이벤트 상시 대기 실시] */
        window.onload = function() {
            console.log("");
            console.log("[window onload] : [start]");
            console.log("");

            // 실시간 체크박스 선택 이벤트 함수 호출
            checkEvent();
        };


        /* [실시간 체크박스 선택 이벤트 함수] */
        function checkEvent(){
            console.log("");
            console.log("[checkEvent] : [start]");
            console.log("");

            // 체크박스 ID 값 지정 >> change 상태 변경 감지
            $("#check_1").change(function(){
                if($(this).is(":checked")){ // 체크된 상태
                    console.log("");
                    console.log("[checkEvent] : [checked] : [OK]");
                    console.log("");
                    //alert("선택");
                }
                else { // 체크 해제된 상태
                    console.log("");
                    console.log("[checkEvent] : [checked] : [NO]");
                    console.log("");
                    //alert("해제");
                }
            });
        };

    </script>

</head>


<body>

<!-- 체크박스 부모 레이아웃 선언 -->
<div style="width: 50px; height: 50px; margin: 0 auto; padding: 0; border: none;
    float: top; position: relative; top: 5%; left: 0%;">
    <!-- 체크박스 선언 실시 : 스타일 none 지정 : checkbox id와 label for 값 매핑 필요 -->
    <input id="check_1" type="checkbox" style="display: none;"><label for="check_1"/>
</div>


</body>

</html>
[결과 출력]
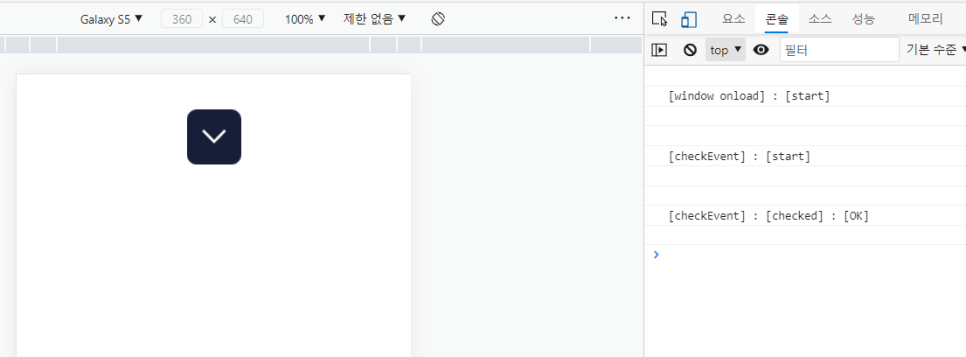
[이미지 파일 첨부]


반응형
'FrontEnd' 카테고리의 다른 글
'FrontEnd' Related Articles
more


Comments